Saturday, February 28, 2009

Shanking the Lamb.

My father loves lamb. He affirms that it's the main part of his hypothetical last meal. I'm sure it has to do with connecting to his childhood in Pakistan where goat and lamb were as commonplace as chicken and beef. Olfaction is said to be the most acute of all the senses in terms of conjuring memories. So it was no surprise when I cooked dinner for his birthday that the gamy smell of slow cooking lamb wafting throughout the house would bring up pleasant memories for him.

The shank of the lamb, or any animal for that matter, is the section between the knee and the ankle. Lamb shanks have tons of flavor as well as connective tissue and marrow. This makes lamb shanks conducive to slow cooking methods. Slow cooking helps the connective tissue and marrow in the shank really melt and break down into pure deliciousness. Enough talking.

Slow Braised North African Lamb Shanks with Israeli Couscous

for the lamb:

4 Lamb Shanks (about 1.25 lbs. each)
1 large onion sliced
4 large tomatoes chopped
4 cloves garlic sliced
2 cups beef broth
1/2 cup red wine or beer
1/2 tsp cumin
1/2 ground coriander (you can substitute an extra 1/2 tsp of cumin)
1/4 tsp chili powder/cayenne pepper
olive oil
salt and pepper
chopped chives for garnish

for the couscous:

2 cups Israeli couscous (it's just like regular couscous but it has larger grains)
2 cups beef broth
1/4 cups slivered almonds
2 tsp olive oil

Preheat the oven to 325 degrees. Place a large heavy bottomed all-metal pot or dutch oven over medium heat. Coat the bottom of the pot with olive oil. Meanwhile season the shanks on all sides with salt and pepper. Brown the shanks, in batches of two, on all sides, 1o minutes per batch. Remove the shanks from the pot and set aside. Add the onions and garlic and saute until soft and translucent, 3-4 mins. Add the wine or beer and using a wooden spoon scrape off the little bits on the bottom of the pot. Add the tomatoes, beef stock, cumin, coriander, chili powder and season with salt and pepper. Bring the mixture to a boil. After the mixture comes to a boil nestle the shanks in the pot. Cover and place in the oven for 3 hours.

The shanks will be tender and almost falling off the bone. Remove them carefully from the pot. Strain the braising liquid to remove the solids. Return the remaining mixture to the pot and place over medium heat. Simmer the liquid until it reduces by half.

To prepare the couscous place a pot over medium low heat and add the olive oil. When its heated add the couscous. Stir the couscous continually until it turns a light brown color and has a nutty aroma. Then add the beef broth. Bring the mixture to a boil then turn the heat off cover the pot for 7 minutes. Fluff the couscous with a fork and add the almonds.

To serve, scoop some couscous onto a plate. Place the shank on top and pour a few spoonfuls of the reduced braising liquid on top. Sprinkle with the chives.

Tuesday, February 24, 2009

Marxism, mmmm spicy.

When I was volunteering in New Orleans, after Hurricane Katrina hit, I met this guy Jeff, perhaps the biggest anarchist I ever met. Jeff had this theory that any unnatural societal order was unnecessary. He felt that people would fall into the roles they were best suited for naturally, without having to rely on a government or leader to place them there. While Jeff's theories were often outlandish this one was particularly salient. After two days of gutting houses I was starting to get fed up with the sub par meals, provided for the volunteers, coming out of the makeshift kitchen. On the third day, I went into the kitchen and let the staff know that I had some culinary experience and I would like to lend a hand. As it turned out, most of the people working in the kitchen had little if any cooking experience so they bolted the kitchen to get back to gutting houses. Jeff, it seems, was right.

Left in the kitchen was myself, one assistant and a surprisingly well stocked kitchen, with most of the equipment provided by locals who survived the storm and volunteers. We had 4 industrial sized burners, a refrigerator and a giant steel drum barbecue, but no ovens. Most of the raw ingredients were provided by other relief organizations and local vendors who just wanted to lend a hand. For instance, after gutting one crawfish fisherman's house, he brought about 200 lbs. of crawfish to our site as a thank you. But more often then not we were dealing with produce that was about to turn and that needed to be used immediately. For some reason we always had way too much cauliflower. We would cook it up as hash-browns for breakfast, blend it into beans for stew and so on. But as it it turns out, cauliflower doesn't taste like much. What it does have going for it is that when blended it takes on an incredibly creamy consistency. Which is great in soup and one of these days I'm putting it in ice cream. So here is a recipe we came up with for the volunteers. I've scaled it down from army-of-hungry-volunteers proportions.

Curried Cauliflower and Sweet Potato Soup

1 cauliflower, cut into small pieces
1 sweet potato, cut into 1/2'' cubes
1 medium onion, chopped
3 cloves of garlic chopped
2 tsp of curry powder
1 tsp chili powder or cayenne pepper
1 15 oz. can of chicken broth
1 cup of milk
2 tsp olive oil
salt and pepper

For this recipe do not worry too much about the cut of the vegetables because they are going to get buzzed in the blender. Place a heavy bottomed pot over medium heat and add the olive oil. When the oil is hot add the onions and garlic and saute until tender, 3-4 mins. When soft add the cauliflower, sweet potato and stir in the curry powder and chili powder. When the vegetables are coated add the broth and milk. Simmer over medium heat for 12 mins. Add the soup to a blender and buzz until smooth. That's it. The sweet potato is a nice addition because it adds a pleasant orange color and the natural sweetness offset the spice.


Friday, February 20, 2009

First Guest Post: Clam Chowda

Today I am featuring my first guest post from my sister's boyfriend Jack. If you would like to guest post let me know. Just cook something, take pictures of it, write up a little blurb and include a recipe. Keep checking back for more.

Chowda ~ Jack Every

One of my all time favorites, being from New England, is a nice bowl of New England clam chowder. The subtle smokiness combined with the plump clams and potatoes are my idea of heaven. While I maintain to be sort of a purist (I shy away from putting lots of crackers in my chowder), I do like some sort of bread for dipping--or better yet, chowder in a bread bowl!

Sometimes, chowders can be too dense and thick, to which I am quite critical. However, this recipe from Jasper White is fantastic. You can even substitute the salt pork for 4oz. of turkey bacon, and it will come out just fine. You can find the recipe here.


Tuesday, February 17, 2009

Reconstructing from memory.

When I was working in Colorado I used to eat lunch at this burrito place called Illegal Pete's. They had this thing called a smothered burrito, which was a burrito of your own creation smothered in green chili. The burritos were pretty standard but once covered in green chili, they were fantastic. I recently had a craving for green chili but had never made it before so I did some research and tried to recreate the same taste at home. Unlike southern chili, which is red in color from either tomatoes or dried peppers, green chili forgoes the tomatoes and dried peppers for fresh green peppers. Green chili is typically a western American dish. This was not one of those dishes I could just whip up with things from the home I really had to go out and specially shop for certain ingredients. Through much tinkering, combining of different recipes and remembering the chili at Illegal Pete's, this is what I came up with:

Note: Chili with an "i" refers to the dish, Chile with an "e" refers to the peppers

Green Chili

6 poblano peppers
8 tomatillos diced (check here if you're unfamiliar with tomatillos)
1 medium onion diced
2 jalapenos diced
4 cloves of garlic minced
1.5 lbs of boneless skinless chicken thighs cut into small cubes
1 cup of chicken broth
1 tbsp. of cumin
1 tbsp. oregano
1 tbsp. garlic powder
salt and pepper to taste
1/2 cup cilantro
2 tbsp. olive oil
1 handful of tortilla chips, crushed
sour cream or yogurt for serving

First, roast and skin the poblano peppers. In order to do this place the peppers directly over the stove flame and rotate them until they are completely blackened.


If you have an electric stove top place the peppers under the broiler in your oven and rotate accordingly. Once the peppers are mostly blackened place them in a bowl and cover with plastic wrap. Let stand for 10 minutes. This will allow the peppers to steam and release their skins. After 10 minutes remove the peppers and peel off their skins with your hands. They should look like this:


Pull out the seeds and remove the tops of the peppers. Dice the peppers and set them aside. Set a heavy bottomed pot or dutch oven over medium high heat. Add the olive oil. Once it begins to smoke add the chicken and saute until browned, 10 minutes. Add the jalapeno, onion and garlic and cook for 5 more minutes. Add the peppers, tomatillos, chicken broth, cumin, oregano, garlic powder and salt and pepper to taste. Simmer on low for 1 hour. Add the crushed tortilla chips and simmer for another 30 minutes. Serve with rice, by itself, or on top of a burrito. This recipe was a shot in the dark; I have never made this before. But, it came out really well. It tasted awesome.

Saturday, February 14, 2009

Too much rice.

Some of the most delicious and iconic foods come from people being confronted with what to do with leftovers. Take french toast for instance. In medieval times, the french found that baguettes did not have a very long shelf life and went stale quickly. So, they sliced up their stale baguettes and dipped them in some egg and fried themselves the now famous breakfast dish. The list of leftovers turned wonderful ranges from meatloaf to bread pudding. But today I was confronted with a very specific leftover problem; rice. Why is it that not matter how much Chinese food you order or how many people are eating it, there is always extra rice? It's one of many mysteries about take out Chinese food that I'm still trying to figure out. Like, why 20 minutes after you've eaten Chinese take out are you hungry again? And, who was General Tso? Is he pleased that his legacy is due to his recipe for chicken rather than his battlefield prowess? One way or another I had too much rice. Two and a half containers to be exact. Between the following two recipes I only got through about 1 3/4 cartons.

First let me say. I never understood the point of making fried rice with left over rice. If I've just eaten Chinese food the night before am I going to want it again? Probably not. So I did my best stray from that path. Although I did use a wok for one of my recipes.

Dirty Rice

This dish is great because you can use whatever you have in your fridge/pantry, so this version is just a reflection of what I had on hand.

1 carton leftover rice
1 can black beans drained and rinsed
3/4 cup frozen corn
1 medium onion chopped
1 bell pepper chopped
1 carrot peeled and chopped
1 jalapeno minced
1 1/2 cups diced cooked chicken
2 cloves garlic minced
1 tablespoon olive oil
3/4 cup chicken broth
1/2 cup salsa
2 tsp cumin
1 tsp garlic powder
salt and pepper to taste

Place a work or large pot over medium high heat and add the olive oil. Once it starts smoking add the onion, carrot, bell pepper, jalapeno and garlic.


Saute for 3-4 minutes until soft and translucent. Add the corn, beans and chicken and mix well. When it is all heated through add the rice and stir. When incorporated add the chicken broth, salsa, cumin, garlic powder, salt and pepper to taste. Lower the heat to medium and cover. Mix every minute or so until the rice has absorbed all the liquid and is heated through. Serve with chopped cilantro.


But that was not the end of my ricecapade. I still had one and a half cartons left and I was only able to use half of the remaining rice. So I made dessert.

Rice Pudding

3 cups of leftover rice
4 1/2 cups milk
3/4 cups sugar
1/2 cup raisins
1 tsp cinnamon
1 tsp vanilla extract
7-8 cardamom pods lightly crushed (optional)

In a pot over medium heat bring the rice, milk, and sugar to a boil. When it has reached a boil set the heat to low and add the remaining ingredients and stir. Let the mixture simmer on low for about 30-45 minutes until most of the milk is absorbed. Serve either hot or cold.


Wednesday, February 11, 2009

Redeeming the Breast.

Recently, I railed against the use of chicken breasts for their lack of flavor and versatility. That got me thinking, could you cook a chicken breast and make it taste good? I'm always up for a challenge so making a tasty chicken breast became my mission. The problem is when dealing with chicken breast you're not left with many options. Sure, I could come up with some wild marinade for the chicken and grill it but that sounded as interesting as a this season of "Lost." What I realized is that the good thing about a chicken breast is that it is a blank canvass. You can do whatever you want to it. Instead of thinking of the chicken breast as the central item of the meal, it could instead be a vessel to serve something else. What would that something else be? Stuffing.

Stuffing is not just for thanksgiving. You can stuff anything really; mushrooms, crabs, pasta shells, potatoes, whole birds, fish, peppers and so on. Why not a chicken breast then? Here's what I came up with:

Stuffed and Rolled Chicken Breasts

2 chicken breasts
2 cups multigrain bread or rolls cut into 1/2'' cubes
1/3 cup diced onion
1/3 cup diced bell pepper (red or green)
1/3 cup diced carrot
3/4 cup chicken broth
1 clove garlic minced
1/4 cup Parmesan cheese grated
1/2 cup good melting cheese (cheddar, monterey jack, brie) grated or cubed small
4 tsp of olive oil
2 tsp fresh sage chopped (or poultry seasoning)
salt and pepper to taste

Preheat the oven to 375 degrees. Start by butterflying the chicken breasts. If you are unfamiliar with that term. Watch this instructional video:


How to Butterfly Chicken Breast -- powered by ExpertVillage.com

After you have butterflied the breasts use a meat tenderized (big wooden or metal hammer) to flatten the breast so it is about 1/4'' thick all the way around. It should look like this:


Set the chicken breasts aside. Place a skillet over medium heat and add 2 tsp. of the olive oil. Add the bell peppers, onions, carrots and garlic and saute until tender and translucent, 4-5 mins. In a bowl mix together the bread cubes, both kinds of cheese, the vegetable mixture, the sage and the chicken broth. Once it comes together add salt and pepper to taste. The mixture should be moist but not overly wet. Season the chicken breasts on both sides with salt and pepper. Spread a thin layer of the stuffing on each chicken breast so it looks like this:


It is important not to overfill the chicken breasts because the chicken will contract as it cooks. If there is too much stuffing it will push out of the sides of the roll during cooking. Roll the chicken breasts up much like you would a rug. You want the roll to be snug but not overly tight. Before the chicken rolls can be cooked they need to be tied. You will need 3 pieces of string or twine for each roll. Set each roll up like so:


Tie a double knot around the the breasts tight but not tight enough to force stuffing out. Just enough to keep the roll together. Cut off any excess string.


In a large skillet add the rest of the olive oil and place over medium-high heat. Add the rolls and brown on all sides, 15 minutes.


After the rolls have browned place them in the oven for 15 minutes. Remove them from the oven and the pan and place on a plate to rest for 10 minutes. Slice the rolls in half inch slices and serve as you like.


Sunday, February 8, 2009

Making a mess of pasta.

Sometimes I am so eager to do something that I don't stop to think about the practicality of what I'm doing. In this case it was making home made pasta. As I was watching the Food Network the other day and I saw some everyday Joe making fresh pasta. I then thought to myself, "Well if this guy can do it, I can certainly do it." In my haste I forgot that I don't own a pasta roller. A pasta roller is a cheap device that allows you to feed dough through two rollers in order to form a long thin sheet of pasta. It looks like this.

By the time I realized I had no roller, I had already made the dough. Now, its not impossible to make fresh pasta without a roller but the roller makes it so much easier. I just ended up having to do a lot more rolling pin work. It's also important to note that fresh pasta is not the same as the dried pasta you buy in the store. Dried pasta is simply water and a hard flour called semolina mixed together and pushed through a mold. Fresh pasta has eggs in it and sometimes oil. With a pasta roller the dish I made would have been very easy to make. I followed the recipe for fresh pasta I found here. I simply rolled the dough out and then cut it into fettuccine-like strands. But you should roll and cut the dough how you like and according to your pasta roller instructions. Fresh pasta cooks much faster then dried pasta. It only takes about 5 minutes. But all the same old rules apply. Cook the pasta in a lot of boiling salted water.

As far as sauce is concerned you can make whatever you like. Just be sure not to go too overboard. If you spent a lot of time and effort making fresh pasta you don't want to totally mask its flavor with a heavy sauce. Making fresh pasta is a real show stopper. People are really impressed by it, so break it out on a date night or when the boss comes over for dinner. The following is my recipe for a basic tomato sauce that I served this pasta with.

1 28 oz. can crushed tomatoes
2 cloves garlic minced
1 small onion minced
1/2 of a medium carrot peeled and minced
2 tsp. fresh thyme, finely chopped (dried oregano is a fine substitute)
2 tsp. olive oil
salt and pepper to taste

Place a heavy bottomed pot on medium heat. Add the olive oil. Saute the carrot, onion and garlic until soft and translucent, 4 mins. Add the thyme and crushed tomatoes and stir. Season with salt and pepper to taste. Cover and simmer on low for 45 mins. If at any point the sauce gets too thick feel free to add some of the cooking water from the pasta.

Here are some pictures from my pasta adventure:


The dough, after it rested.


The rolled out pasta.


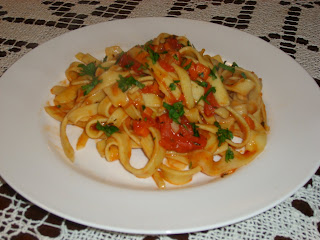
The finished product.

Saturday, February 7, 2009

Breasts are dry.

No, seriously. Chicken breasts are generally a dry flavorless piece of meat. They are popular because they provide an easy fat free protein source. From a flavor standpoint they bring about the same things to the table as caulk, that is to say, not much. I find the most flavorful and underused piece of chicken to be the thigh. While it’s true the thigh has a slightly higher fat content than a breast, we all know that fat = flavor. Not only that, but the thigh is easy to cook, stays moist and has a deeper chicken flavor. Thighs are great for grilling or roasting because they don’t dry out. In this recipe I’ve braised them, mostly because it’s a tasty way to prepare chicken, but also because I’m on a braising kick. To braise is to cook something in a small amount of liquid for a long time. The following is my recipe for spicy braised chicken thighs.

4 bone in chicken thighs with skin on

1 12oz can chopped tomatoes

1 large onion sliced

2 cloves garlic minced

1 cup of chicken broth

1-2 jalapenos minced

1-2 chipotle peppers from a can, minced

Parsley for garnish

Salt and pepper to taste

1 tbs. olive oil

*Chipotle peppers are just smoked jalapenos, they can be found canned in the international foods section of the supermarket


Preheat the oven to 375 degrees. Dry the chicken thighs and season them on both sides with salt and pepper. Turn on a burner to medium-high heat and place on it a heavy bottom pot or Dutch oven. Add the oil to the pot. Once it begins to smoke add the thighs skin side down. Once they brown flip them over and brown the other side, 10-12 mins. Remove the thighs to a plate. Drain any extra grease, reserving enough to sauté the remaining vegetables. Place the pot back on the heat, reduce the heat to medium and add the onions, garlic and jalapenos. Once they soften and become translucent, 5 mins, add the chicken broth, tomatoes and chipotle peppers. Stir and add salt and pepper to taste. When the mixture comes to boil, add the chicken thighs and cover. Place the pot in the oven and cook for one hour. To serve pull the thighs out of the braising liquid and spoon some of the tomatoes and onions over the top. Serve with rice. Garnish with chopped parsley.